LEARN MORE ABOUT MAPPING PANELS TO YOUR ROOFLearn More
Map My Roof
Take me to more information about…
 Locating your roof
Choosing map imagery
If you see an option to choose between State Government Imagery and Google Maps at this stage of mapping your roof, it means there are two different versions of the map available in your area.
Switch between the two options and choose the one that is most up to date and best displays your current property area.
Getting the right zoom level
Sometimes it can be hard to tell how far you should zoom in or out before mapping your roof. Here are some questions you can ask to check:
Is your property the main thing taking up space on screen? (It should be!)
Can you clearly see the full outline of your roof on screen?
Can you see any nearby trees or buildings that cast shade onto your roof?
-
For new builds, extensions, or cases where the image is too far out of date and missing key features like surrounding trees or buildings, you can still use SunSPOT!
Just position the map frame to fit the property and surrounds as usual and move on to the next step. If you are in an area with LiDAR mapping (you’ll see coloured dots on the image), just switch the toggle that says “Some or all of my roof doesn’t show dots” and add shading objects and panels that best reflect the current property.
 Assessing your roof
SunSPOT can help you find the best areas on your roof for solar panels in one of two ways, depending on where you live in Australia. If you live in an LGA that has a council subscription to SunSPOT and has existing 3D spatial mapping LiDAR data available, you will see colourful dots that show you which parts of your roof get the most sunlight throughout the day. If you live anywhere else in Australia, you won’t see those dots and will need to add shading objects to help find the sunniest parts of your roof.
I have colourful dots
This means that you are using the most accurate version of SunSPOT, and assessing your roof will be easy. The best areas to place your panels will be covered with red dots, meaning that they get the most solar radiation through each day of the year. You should avoid placing panels anywhere with light or dark blue dots if possible.
If the dots don’t cover your roof or if they don’t match the shape of your roof, you’ll need to flip the toggle that says “Some or all of my roof doesn’t show dots” and follow the next steps.
I have dots, but they’re all the same colour
This means that your property was probably built after the 3D mapping LiDAR data was collected for your council area. If this is the case, all you need to do is toggle the switch that says “Some of all of my roof doesn’t show dots” and complete the mapping process using Standard SunSPOT.
I don’t have colourful dots
This means that you will need to add shading objects to help find sunny areas on your roof. Once you have added any shading objects that cover nearby trees or buildings, try selecting the different seasonal options to see how the shading changes through the year. The best areas to place panels will have minimal shade across all seasons.
You can add up to five shading objects in SunSPOT.
 Adding panels
Once you know which parts of your roof could be good for solar performance, it’s time to place your panels. Add panels to see what what fits on your roof and test different system sizes and layouts. At the moment, SunSPOT limits each panel group to a maximum of 150 panels.
How to place, move and resize panel groups
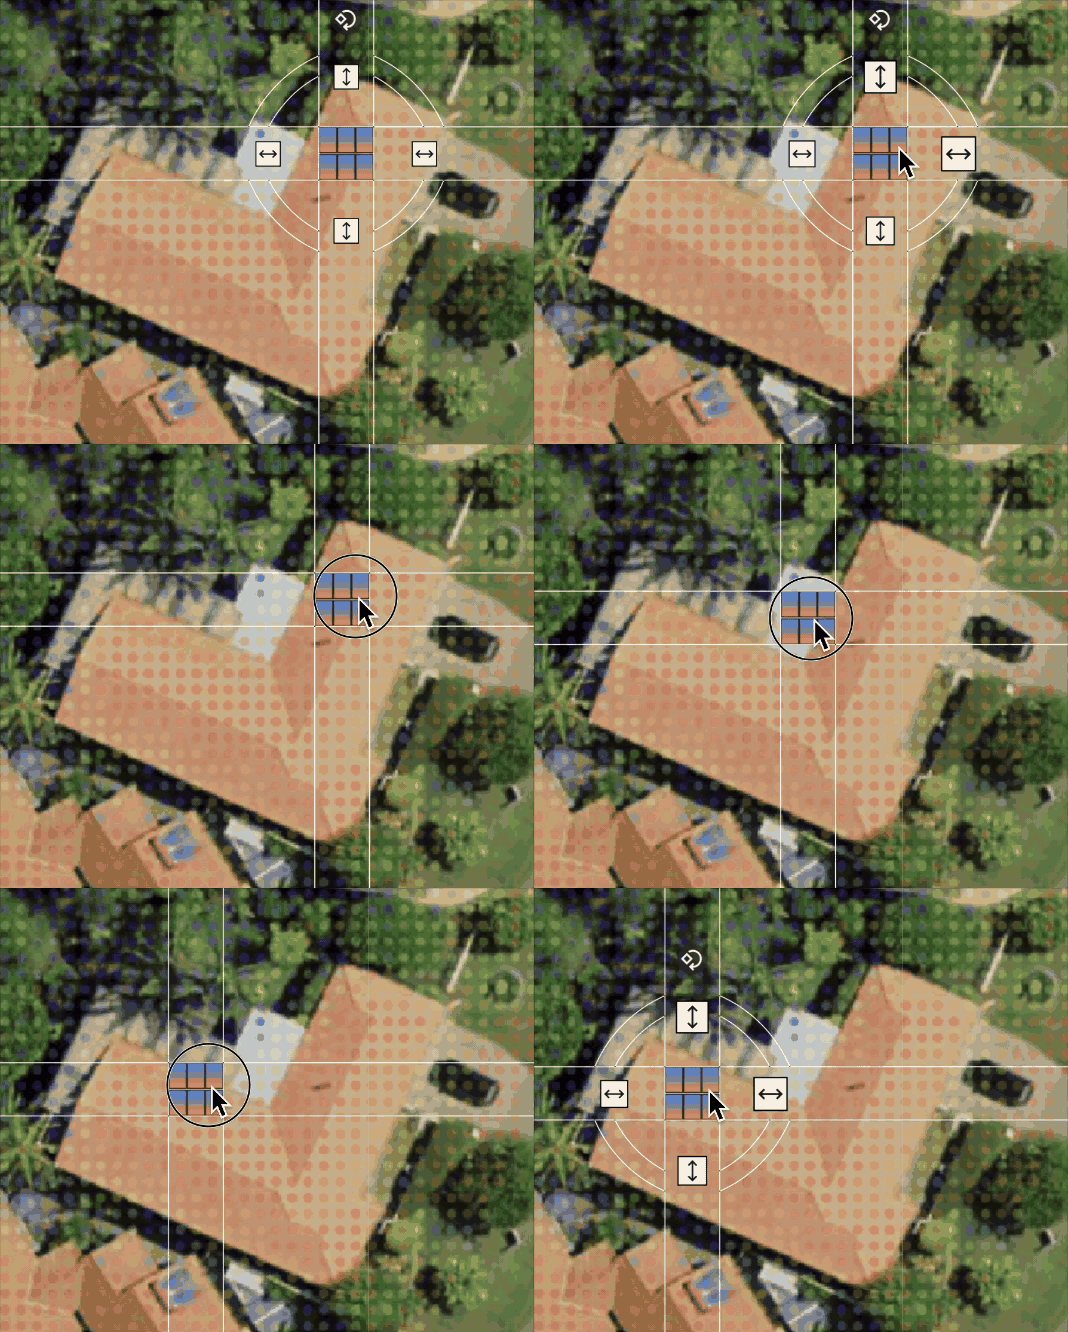
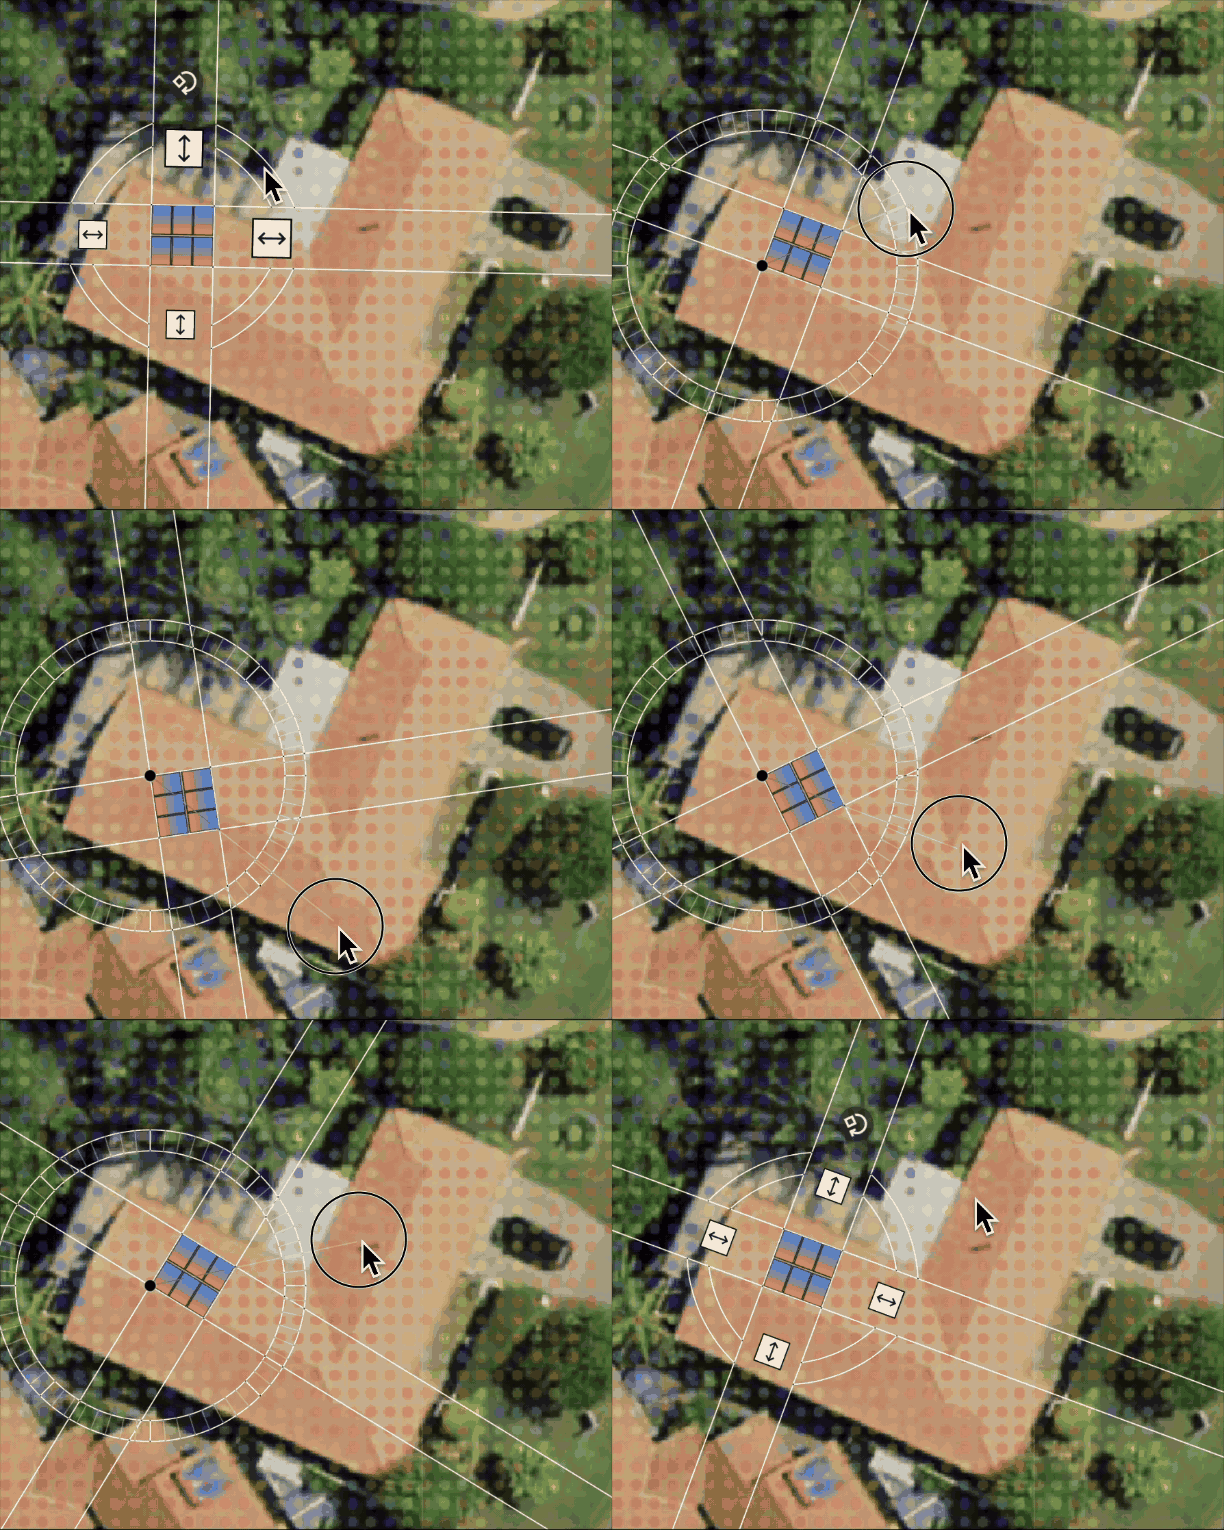
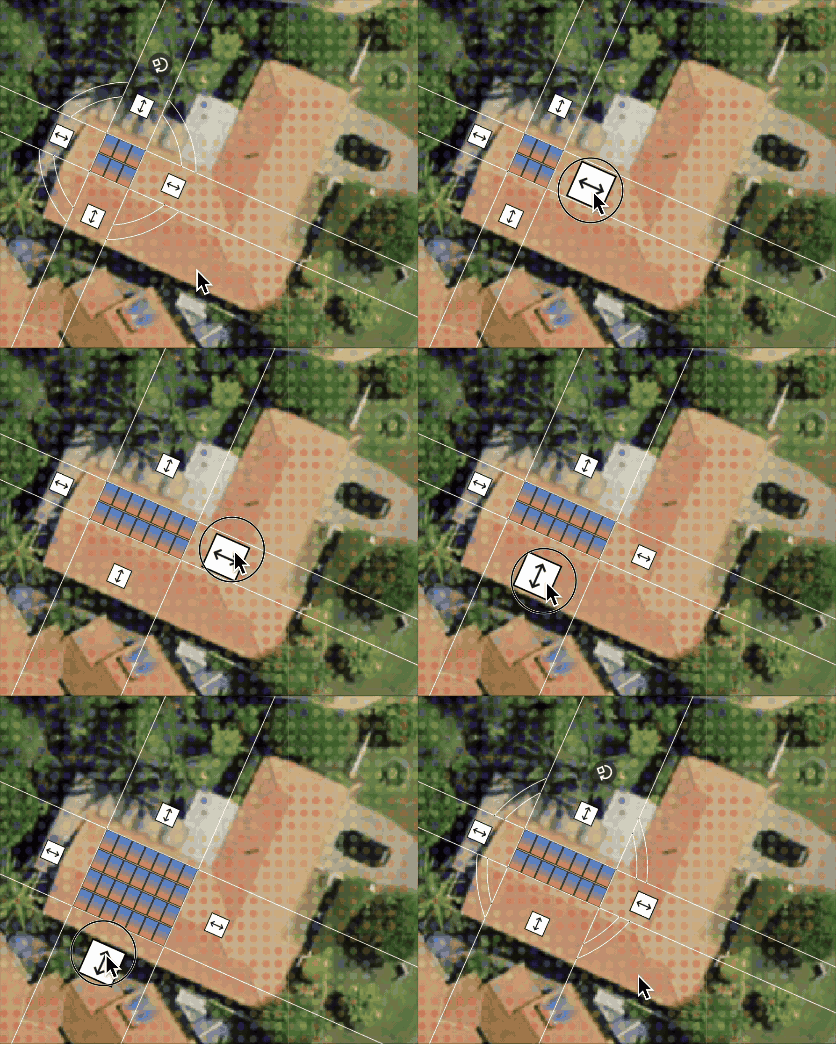
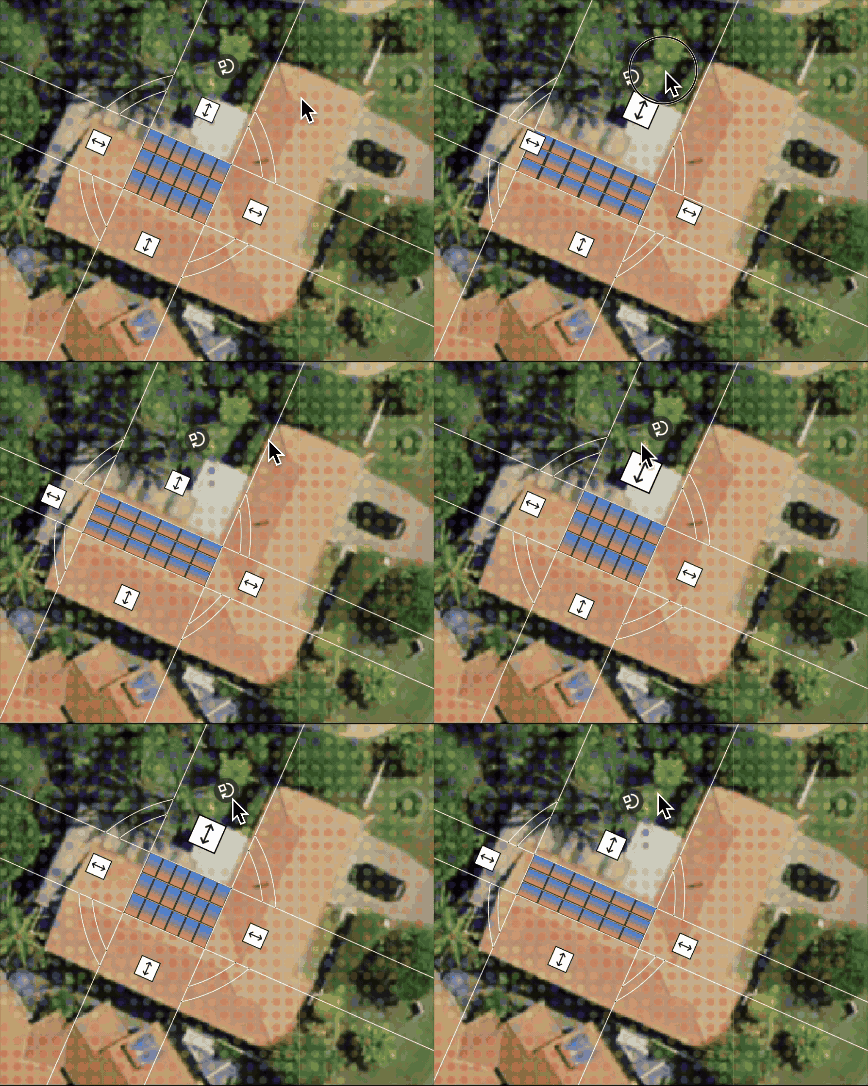
Once you’ve added a panel group, click or tap and drag the group into position.
To rotate a panel group, click or tap and drag the white circle surrounding the panels.
Click or tap and pull the arrows either side of the group to add or remove panels.
The small grey circle with a curved arrow and small square icons will flip the orientation of all panels in the group from portrait to landscape (and back).
How to place, move and resize shading objects
If the Premium version of SunSPOT is not available in your area and/or you don’t see colourful dots covering your roof, you can add shading objects to find out where the shade is most likely to fall on your roof. This helps find the most sunny areas of your roof to place panels.
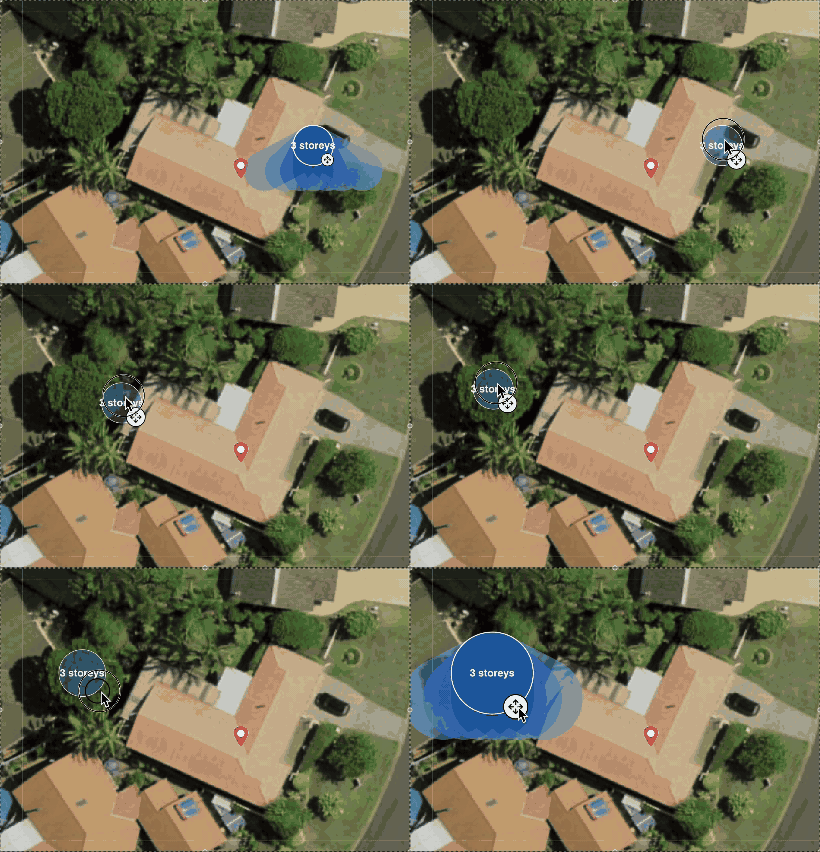
Click or tap and drag the object to move into place.
Use the small white circle icon with arrows to resize the diameter of the object.
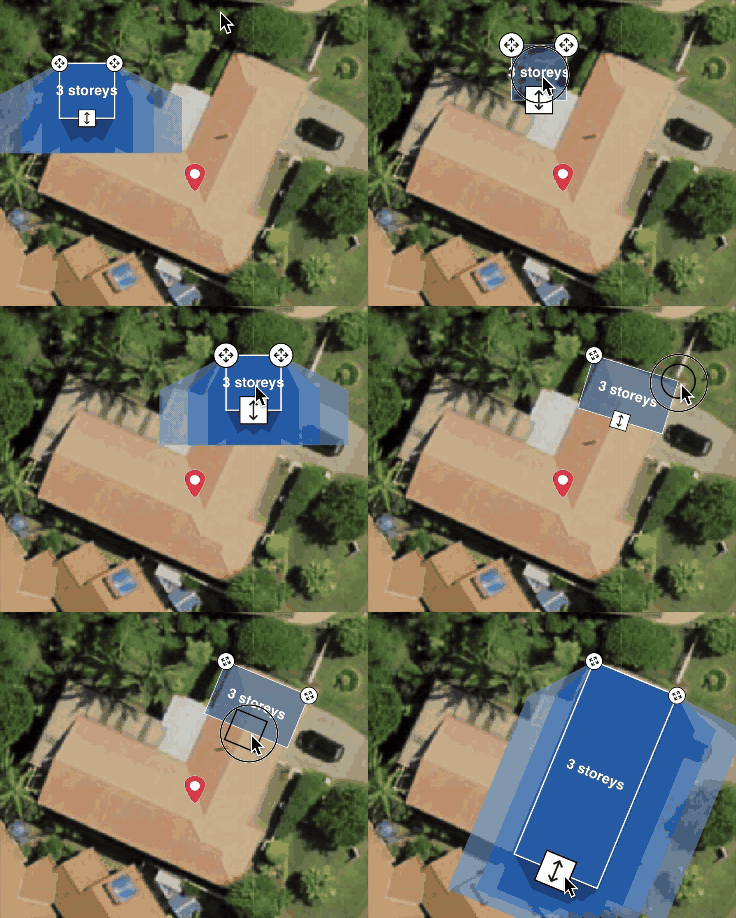
Click or tap and drag the object to move into place.
Use the white circular icons to pivot the rectangle and adjust its width.
The white square icon adjusts the length of the rectangle.
Tips for placing panel groups
Do:
Leave roof space around each panel group
Make sure that the blue edges of each panel group are lined up with the edge of the roof section that they’re place on
Test different panel orientations, system sizes and layouts
The black arrow on this image shows that this panel group is now lined up in the right direction, with the blue edge aligned to the roof edge.
Don’t:
Place panels overlapping ridge lines or edges
Place panel groups too close together or overlapping
Place panels on top of chimneys, vents or skylights
Place panels in heavily shaded areas
Highlighted areas in the above image show where panel groups are too close together, too close to the roof edge, or overlapping ridge lines.
For some properties, this may restrict how many panels you can actually fit - if you can’t fit the suggested system size on your roof, this is a good chance to calculate a new estimate with a more realistic system size for your property.
Panel specifications
SunSPOT uses different power ratings and dimensions depending on whether you are mapping a residential or commercial solar system to your roof.
For residential systems, panels are 1.13m x 1.72m and with a rated power of 400W.
For commercial systems, panels are 1.05m x 2.07m with a rated power of 440W.
Note: If you receive a quote with a design that differs from the outlined considerations on this page or other quotes, ask your solar retailer or installer for explanation. There are considerations and regulations not included on this page and SunSPOT which the designer has included. They should be able to provide clear explanations to you for their choices.
Advanced options
-
Flush mounting is most common for residential properties, and means that the panels are mounted following the existing slope of your roof.
Rack mounting is an advanced feature most suitable for flat roofs. It means that panels can be mounted at an angle different to the slope of the roof which can improve performance on a flat roof. Rack mounting will add to the cost of your system.
In SunSPOT, the rack mounting option will only become available on flat roofs.
-
If the section of the roof that your panels are placed on is not flat, you can use this advanced option to confirm the slope of your roof.
For users with 3D spatial mapping LiDAR data (coloured dots), SunSPOT usually has a pretty good estimate of the roof slope already. However, if the LiDAR data is not up-to-date or the slope looks wrong for that section of the roof, you can set the actual slope here.
Users without LiDAR data can choose from four standard roof slope options, but can use this feature to add more precision for a more accurate estimate.
 Micro-inverters and panel optimisers
Micro-inverters and solar panel optimisers can increase solar generation on a shady roof or for systems made up of lots of panel groups facing different directions.
This is because each panel's performance is optimised separately, unlike with regular string inverters. In a string system, when one or more panesl are shaded or facing away from the sun, it could have broader impacts across the string. There are usually only 2-3 strings available per inverter.
However, micro-inverters and solar panel optimisers will add to the cost of the system.


